Showing posts with label tools. Show all posts

Tuesday, December 9, 2014

Who Loves Tools?

Bill next to tools with which to pound.
My Mom and Stepdad (Grammy and Grandpa Bill) made it safely to Georgia for Thanksgiving, and one day while they were here, because Bill Loves Tools, we visited a nearby museum that has a great tool room.

The collection is short on gardening tools, but there is plenty of everything else, and it's all artfully enough arranged that even non-tool-lovers can appreciate the displays.

I have some favorite, hard-working garden tools at home, but even if I were no longer using them, there aren't enough to make even one of these display boards!
Mom by the keys, because she is a Kappa Kappa Gamma.

Mom and Bill and tools.
In the last year or so, Bill has had to slow down some in his use of tools, but he did seem to enjoy the tool room at the museum.

He had been in radio communications on an aircraft carrier in WWII, and some of the artifacts in the tool room prompted him to share some episodes from his wartime experience. That was the first I'd heard from him about that part of his life. It made the museum-visit all the more worthwhile.

The two made it safely home after the holiday, and  - while the garden is in a bit of a "waiting" mode right now - the seed catalogs for next year have begun to arrive. Four already are stacked by my chair in the living room.

I would say that it is too early, like Christmas decorations showing up in stores before Halloween, but thinking about the garden is such a good thing that it's hard to complain.


Sunday, August 25, 2013

Planting the Fall Garden Continues

After getting the last few weeds out of the former squash/melon bed, I dumped a wheelbarrow-load of compost on top of the bed, spread it across the entire surface, worked the whole bed over with my grub hoe, tossed on some kelp and cottonseed meal, raked/pounced the amendments into the top couple of inches, used my widest short-tine rake to smooth the top, then got busy planting.

The above set of tasks is why gardening isn't for those who require instant gratification; very little about gardening is instant! Getting the bed prepared (not including pulling out the old crops, which I had already done) took awhile. Getting it planted took about five minutes.

I used my seeder to plant two rows of spinach (mixed with some regular radish seeds) and two rows of beets. Those four rows went along the edge nearest the house. This particular bed is fairly wide, so the farther half was broadcast with buckwheat, for a fast cover crop while I am waiting for time to plant a longer-term, winter cover in that space.

My seedlings (currently in little pots) for the cabbage family plants and the lettuces (and etc.) are coming along nicely, but their spaces won't be vacant for another week or two. I think they will be fine, but I will be happier when they are safely in the ground.

The carrots and winter-radishes came up just fine on their own, but no rain is in the forecast for the next several days, so I might actually need to water the spinach, beet, and buckwheat seeds to keep them damp enough to germinate.

Hope that everyone else's fall planting is on track!

Sunday, August 26, 2012

Forward Movement

I've been an organic gardener - doing the research and putting what I've learned into practice in my own yard - for a long time. Locating amendments and special "inputs" like seeds for cover crops on a garden-scale has been getting easier over the years, but there have always been items that had to be mail-ordered.

When the things you need suddenly are available in appropriately-sized packages in main-stream stores, that's a clue that a lot more people have become interested in the same things.

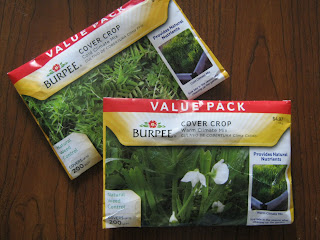
These cost way more than I would usually pay, but I couldn't resist. This is so great!:


I found these at the Home Depot in Kennesaw, when I was just checking the seed rack to see what was there. The cool season mix contains seeds for hairy vetch and ryegrass; the warm season mix has seeds for Austrian winter peas and ryegrass. (I like how they couldn't decide which was actually good for our area, so we get both!)  The packets each contain enough seed for 200 square feet of garden. With the easy-availability of these seeds, maybe more people will experiment with cover crops and find that they are a great help in the garden.

In other news - yesterday I attended a Small Scale Intensive Farming workshop, sponsored by Georgia Organics, the National Center for Appropriate Technology, and the USDA Risk Management Agency. Andy Pressman, of NCAT and a farmer who uses multiple small urban plots as his farmland, was the featured speaker.

The morning was filled with discussion of the business considerations of small-farming, and the afternoon was filled with technical considerations, including what tools are best for what purposes in very-small-scale farming enterprises like his. 


Pressman's planting beds are 2 x 25 feet, and most of his "paths" are just 12 inches wide. With this tight spacing, tools need to be small and maneuverable. The biggest piece of equipment he uses is a walk-behind tractor by BCS (a European company). Everything else he showed us was hand-powered.

The seeder he demonstrated is the Earthway model that I have - I used it to plant my carrots this spring. He also brought along a whole assortment of hoes and demonstrated their correct use while talking about the benefits of each one.


While there, I met lots of great people who are all working on farming. Some are brand-new farmers, some are still in the planning stages, and some are fairly experienced. All in all, it was a great day!

Here at home, the cabbages I planted last week are doing well. I'm pretty sure they're bigger than they were when I saw them on Friday - I feel a little like one of those old ladies who exclaims to a child - "My how you've grown!"


And these are the carrots, seeded a couple of weeks ago with the seeder that my family gave me for my birthday this year:


I hope everyone else's gardens and gardening-knowledge are making as much forward progress!


Sunday, January 24, 2010

Tools Inventory: A Wee Widger


The slender metal tool on the rim of the flat is a widger, a tool for transplanting seedlings from their starter medium (which is usually a very low nutrient, sterile, finely textured mix) into a more nutritious medium for their next stage of growth.

My father-in-law, an engineer, used to remind us that it was important to use a tool designed expressly for whatever task was at hand ("the right tool for the right job"). On Friday, I used my widger to lift the delicate little potato seedlings from their very small starter flat, and to open up planting-holes in the potting mix that fills the larger flat that will be their home for the next few weeks. It was the right tool for the job.

However, before I had my widger, I used a table knife for the same purpose, and a good friend uses an old paring knife. My father-in-law might not have approved (he has been gone for ten or so years), but it is unlikely that I would have harmed the table knife by using it in this way, and it worked just fine.

He would have been glad that I finally used the appropriate tool, though. Happily, a widger is not an expensive item. Mine is from Bountiful Gardens, and it cost $5 plus S/H.

Joe (husband) made the wooden flat to fit in the baker's rack that stands by the back door. While the seedlings are small, two fluorescent bulbs lie across the top of the flat. As the seedlings grow, those lights will be raised slowly (suspended by strings) to stay just an inch or two above the tops of the plants.

Monday, November 30, 2009

Tools Inventory: I (heart) My Compost & Mulch Fork


Some years, I ask my husband for a new garden tool for my birthday or Christmas; sometimes, I don’t even specify the kind of tool I want. My compost & mulch fork was the result of just such a tools request for my birthday one year, and it turned out to be a wonderful surprise.

This particular fork has 10 fairly closely spaced tines that are not especially pointed at the ends. Using the compost & mulch fork to turn the compost pile a couple of days ago reminded me that it’s a tool that really works!

Anyone who has tried to shift compost using a spading/digging fork will have had the experience of watching the littler bits fall right through the spaces between the tines. A shovel, though, sometimes can’t even be shoved very far into a compost pile because it jams up against a tough piece of plant that hasn’t yet decomposed.

My compost & mulch fork avoids both of those problems. The tines are spaced closely enough to hold the crumbly, dark compost, but the spacing is wide enough that the fork doesn’t get hung up on the un-decomposed bits. The fork goes right into the pile and comes away with a full load.

Even better, the fork works for more than just compost. It works for chipped wood that we get a load of each year to spread on paths through the backyard, and it works for manure, grass, and old, soggy leaves.

I have seen similar forks online at Lee Valley ($65) and at Lowes Online ($36), but I have also seen them at the old Cobb Hardware store (price similar to Lowes) on Roswell Street in Marietta.

It is hard for me to admit that my compost & mulch fork is not really a necessity, but that is true. I could get by with my spading fork and a regular shovel, which are both ESSENTIAL tools. The compost & mulch fork does make some tasks a lot easier, though.

A couple of my sisters have birthdays in the same month as mine, and the year I was given the compost & mulch fork I remember a conversation with one of those sisters, that I told her about my great gift, and that there was a moment of silence on the phone. Then she said something like “I got a diamond bracelet.” Now, I am sure that the bracelet still brings her plenty of pleasure, but it is hard to imagine that she gets as much enjoyment out of that bracelet as I get from my compost & mulch fork.